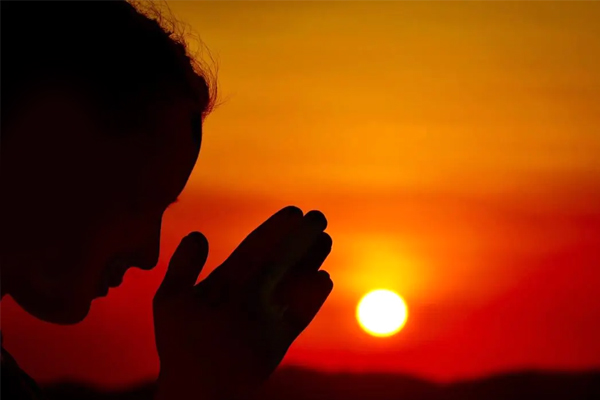
Importance of Surya that is Sun
Sun represents life, energy, positivity, clarity, confidence, and more. Sun is the ever-present energy. Without it, creatures and beings on Earth can’t survive. Additionally, the sun is also an important contributor to life in the form of many nutrients it provides. Sunshine bring about positivity. Suryanamaskar is a way to pay regards to the Sun – the energy provider & the source of everything. Surya namaskar is not only a physical exercise but also a spiritual activity in which we offer our gratitude to the divine energy of sun by offering 13 Suryanamaskar with ‘mantras’ everyday.
Why Suryanamaskar?
We might be living longer in the 21st century, but are we really living better? Millions of people follow unhealthy lifestyle. Whether it’s sitting at their desks for too long, subjecting their eyes to uninterrupted hours of screen time on phones or desktops, children spending hours on different type of screen, ordering too many takeaways for dinner, or not finding enough time to catch those precious 8 hours of sleep,,, all these factors have led to people encountering major health issues, that affects not just their physical wellbeing, but also mental health, causing intense stress and anxiety. While exercising is an effective way to combat these health issues, the ancient practice of Suryanamaskar is a much better way in battling modern lifestyle diseases.
Benefits of Suryanamaskar
Along with numerous health benefits, Surya Namaskar provides a stepping stone in the direction of a healthy lifestyle. Just the single act of doing the practice in the morning sets the tone for an energetic and positive day. The process of waking up early to workout 13 Suryanamaskar can enhance your productivity by giving you more time and energy for the things you enjoy doing. Of course the health benefits are some of the most important things to focus on.
- The general posture of the body is improved with the creation of a strong and flexible spine.
- Improvement of blood circulation to the whole spinal and para-spinal area.
- Enhancement of musculoskeletal functions of the upper and lower limbs.
- Cardio-respiratory functions are improved.
- Metabolism of the body is improved.
- Activation of the sluggish neuroendocrine system.
- Boosts immunity system.
- Digestion is improved.

Suryanamaskar for the Mind
Practicing 13 Suryanamaskar rotations a day has proved to have a positive impact on enhancing the cognitive functions of the brain while also relaxing the mind. Suryanamaskar when coupled with chants, helps to provide the proper balance between body, breath, and mind. Chanting mantras while performing Suryanamaskar helps to develop spirituality and establish a deep sense of gratitude towards life, thereby providing an absolute peace to the mind and the soul.

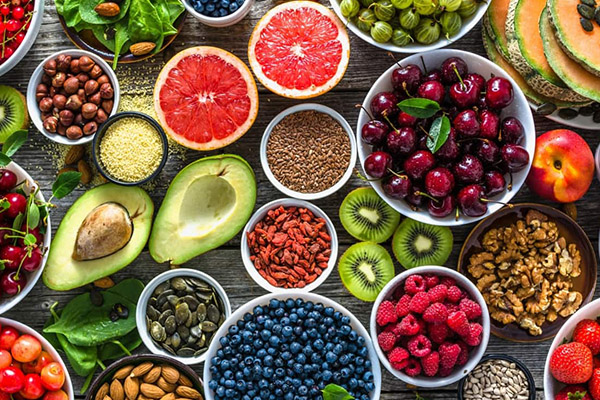
Diet
Suryanamaskar can be performed with your day-to-day food intake. However, it is always good to embrace a Sattvik (healthy) diet. If Sattvik diet is a bit too much for you, you can also look towards a Rajasik (balance) diet while avoiding Tamsik (Unhealthy) food and beverages.
Precautions to be taken during practice of Suryanamaskar
Do :-
- Adequate warm-up should be done before practicing Surya Namaskar.
- It should be properly synchronized with breathing.
- It should be performed in a peaceful place with fresh air.
Don’t :-
- Don’t eat or drink immediately before and after doing Suryanamaskar.
- If you have any health issue, please consult your doctor.
- Suryanamaskar should be avoided during the menstrual cycle and pregnancy.

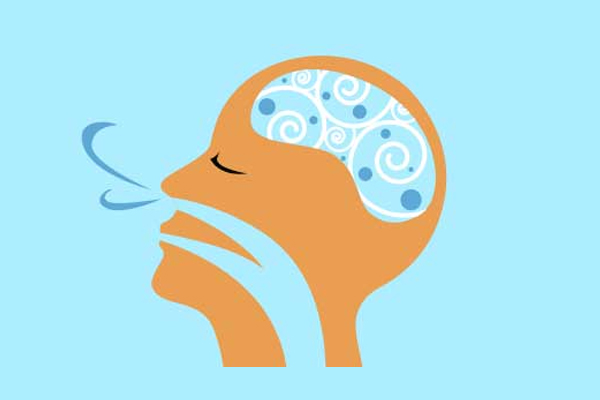
Suryanamaskar Breathing Pattern
Suryanamaskar must be done with proper breathing pattern known as – Purak, Rechak and Kumbhak.
Purak : Inhale
Rechak : Exhale
Kumbhak : To hold (neither inhale nor exhale). Read the steps part to understand the breathing pattern. Due to the rhythmic and active breathing process, the lungs are thoroughly ventilated and the blood gets highly oxygenated. This aids the detoxification of the body while also improving the flow of lymph which carries toxins to the organs of excretion. Following the rhythmic breathing pattern also helps in mental health.
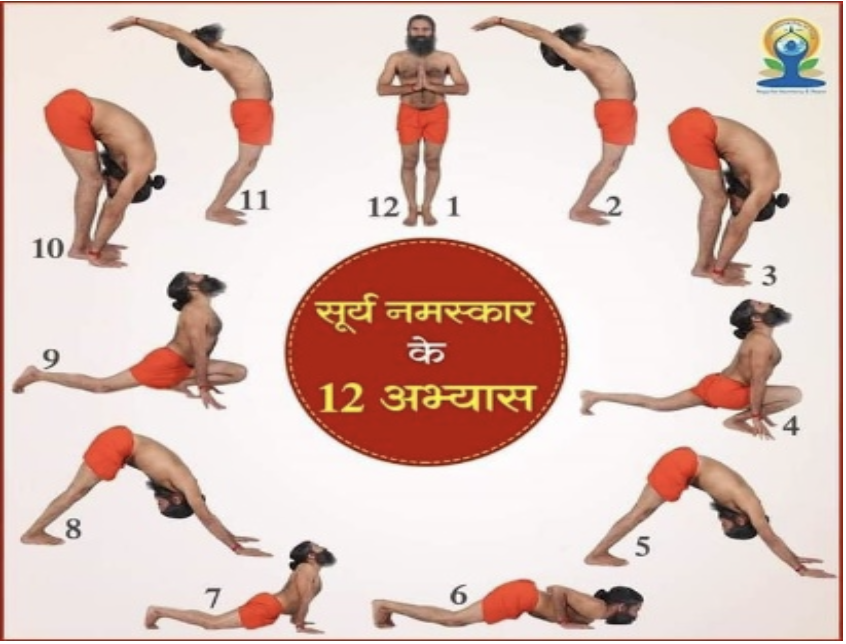
Suryanamaskar Steps to Follow
Suryanamaskar can be done at any time of the day. However, the best time to do Suryanamaskar is at sunrise as exposure to the sun activates our solar plexus.
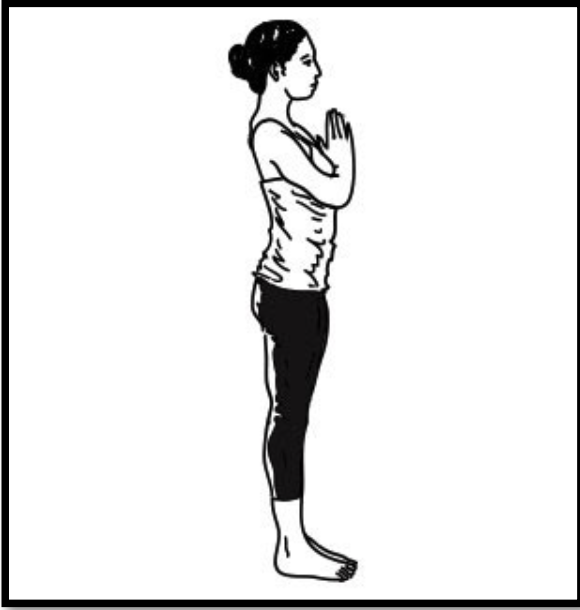
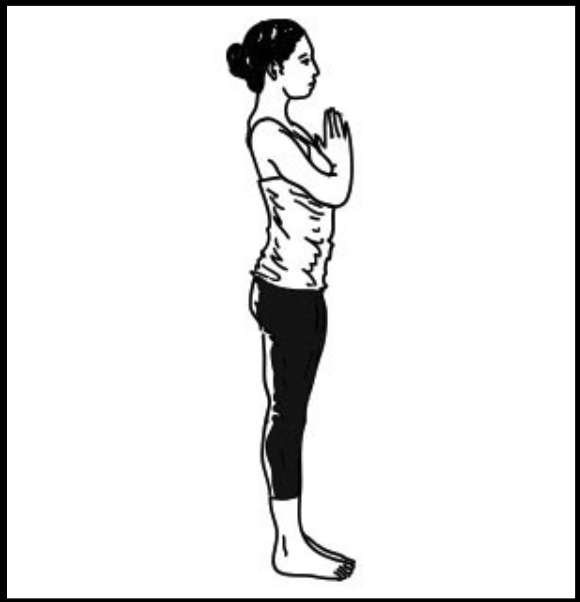
Step – 1. Pranamasana – Prayer Pose (Normal Breathing)
Stand erect with feet together. Join the palms together in front of the chest in a Namaskar Mudra. Concentrate on standing straight, steady and in a meditative mood.This posture helps to induce a state of introversion, relaxation and calmness. It activates the Anahata chakra or Pranic centre an energy centre located in the heart region.
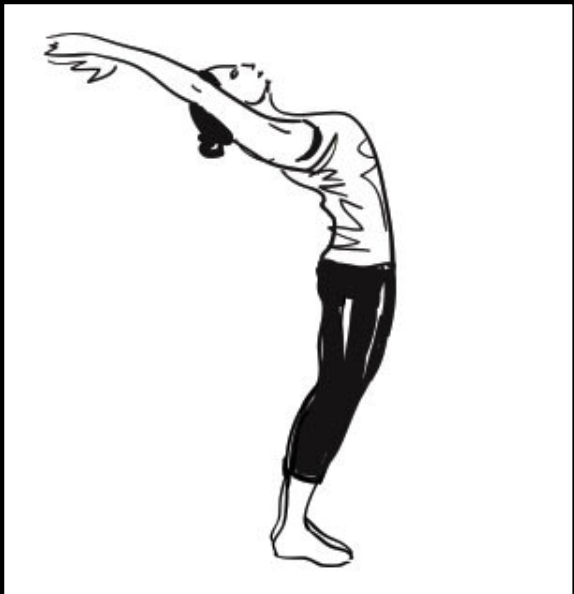
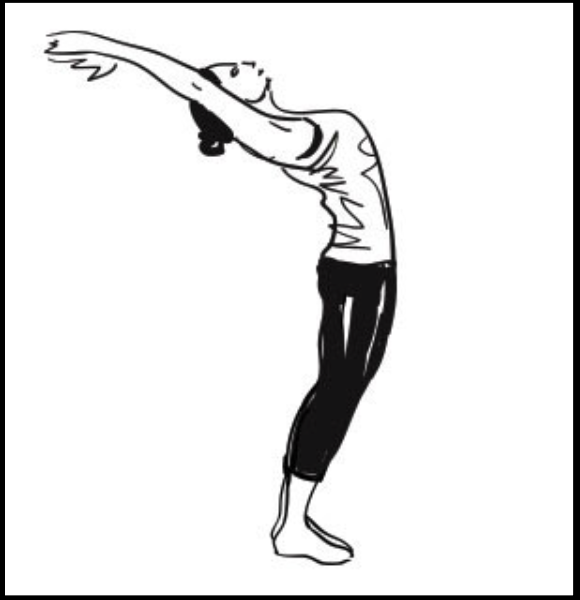
Step – 2. Hastautthanasana – Raised Arms Pose (Purak - Inhale)
- Breath-in, lift the arms up and bend back, keeping the biceps close to the ears.
- Stretch both arms above the head, palms in namaskar position. Arch the back and stretch the whole body.
- Eyes focussed towards the sky.
- This posture stretches the chest and the abdomen and lifts the prana (energy) upwards to the upper parts of the body.

Step 3. Padhastasana – Standing Forward Bend Pose (Rechak - Exhale)
- Bend the body forward from waist and stretch down, keeping the spine straight. Keep the legs straight and perpendicular to the ground. Knees not to be bended.
- Try to place your palms on the floor in open position near both side of your legs. Or if it is not possible then try at least to touch the toes of your legs with the finger tip of both hands.
- Try to touch your knees with your head.
- This posture massages the abdominal organs.
- Exhale fully as you reach the bent position.
Step 4. Ashwa Sanchalanasana – Equestrian Pose (Purak - Inhale)
- Extend the left leg back and drop the left knee to the ground.
- The right knee is bent up and right foot is placed between the palms, flat on the ground.
- Lift the spine and expand the chest. Look upward towards the sky and concentrate at the centre of eyebrows.
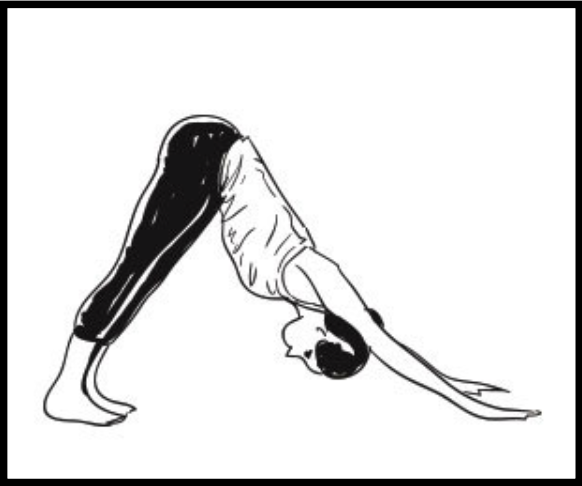
Step 5. Parvatasana – Mountain Pose (Rechak - Exhale)
- Raise the buttocks and move the head inward between the arms and facing the thighs so the body forms a triangle with the floor.
- Keep the palms flat touching the floor. Place both feet flat on the ground. Try to place the heels flat on the ground.
- Focus your awareness at the neck area. This posture strengthens the nerves and muscles in the arms and legs, stretches the calf muscles and makes the spine straight and taut. It relieves varicose veins and tones spinal nerves.
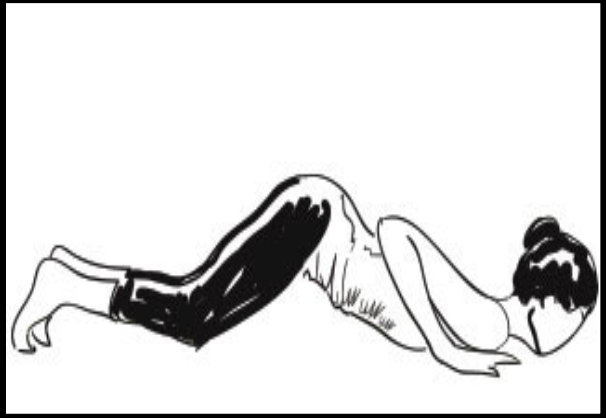
Step 6. Ashtanga Namaskar Asana – Salute with Eight parts or points (Kumbhak - Neither inhale nor exhale)
- Gently drop both knees to the ground and slowly slide the body down at an angle as you bring the chest and forehead to the ground.
- The two hands, two feet, two knees, chest and forehead (eight parts of the body) should touch the floor. The buttocks are kept up.
- This posture develops the chest and strengthens the arms. It sends additional blood to this area helping to rejuvenate the nerves.

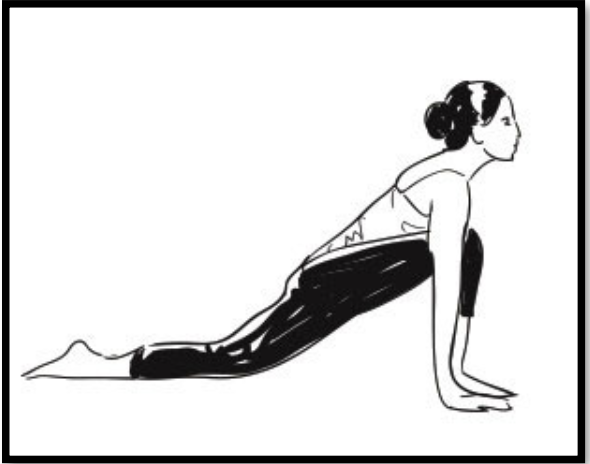
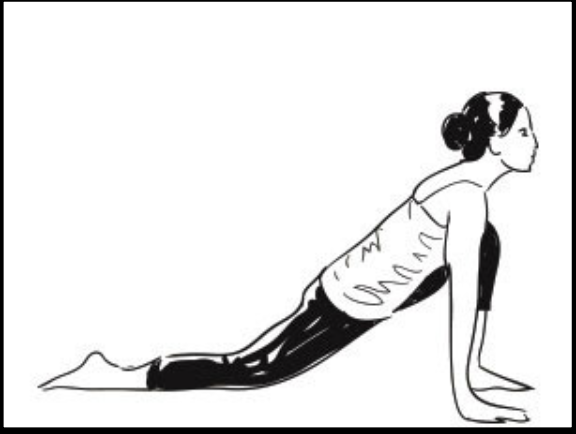
Step – 7. Bhujangasan (Purak - Inhale)
- Lower the hips while pushing the chest forward and upward with the hands, until the spine is fully arched and the head is facing up.
- The toes, knees and palms remain in same position as in the last posture.
- Upper part of the body from the knees is stretched upward. Head towards the sky.
- Focus your awareness at the base of spine and feel the tension from the forward pull.
- make a gentle effort to push the chest forward.
- This pose gives dynamic expansion to the organs of the chest and abdomen, relieving many ailments such as asthma, constipation, indigestion, kidney and liver problems. It is very helpful in relieving tension in the back muscles and spinal nerves.
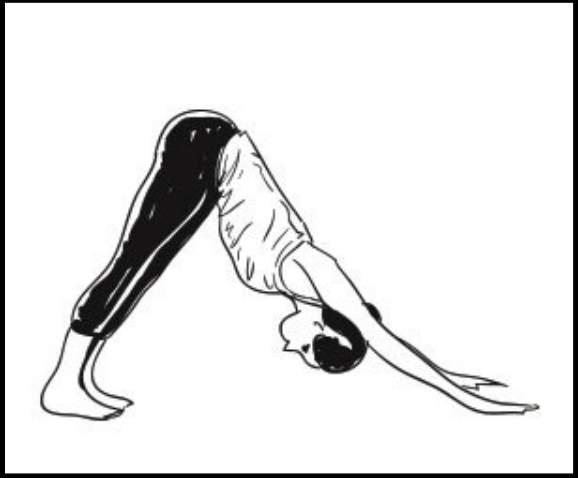
Step – 8. Parvatasana (Rechak - Exhale)
- Raise the buttocks and move the head inward between the arms and facing the thighs so the body forms a triangle with the floor.
- Keep the palms flat touching the floor. Place both feet flat on the ground. Try to place the heels flat on the ground.
- Focus your awareness at the neck area. This posture strengthens the nerves and muscles in the arms and legs, stretches the calf muscles and makes the spine straight and taut. It relieves varicose veins and tones spinal nerves.
Step 9. Ashwa Sanchalanasana (Purak - Inhale)
- Same as position no 3 but this time bring the left foot forward in between the two hands.
- The right knee goes down on the floor.
- Place the left foot exactly between the two hands and the left calf perpendicular to the floor. In this position, make a gentle effort to push the hips down towards the floor, to deepen the stretch.
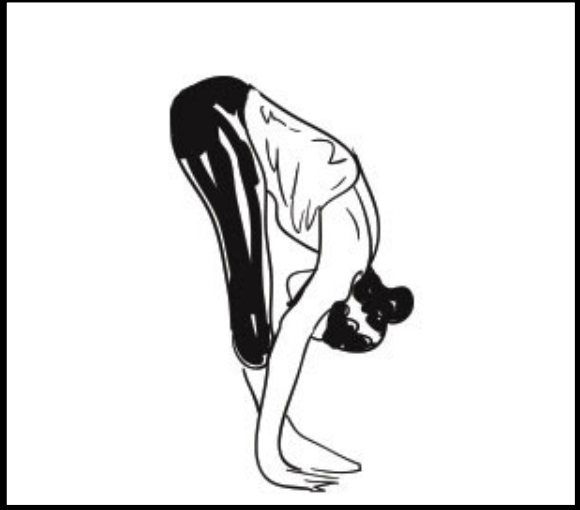
Step 10. Padahastasana (Rechak - Exhale)
- Breath-out, bring the right foot forward. Join both legs. Keep the palms on the floor and come back to Posture 2.
- Bend the body forward from waist and stretch down, keeping the spine straight. Keep the legs straight and perpendicular to the ground. Knees not to be bended.
- Try to place your palms on the floor in open position near both side of your legs. Or if it is not possible then try at least to touch the toes of your legs with the finger tip of both hands.
- Try to touch your knees with your head.
Step – 11. Hastautthanasana – Raised Arms Pose (Purak - Inhale)
- Breath-in, lift the arms up and bend back, keeping the biceps close to the ears
- Stretch both arms above the head, palms in Namaskar position. Arch the back and stretch the whole body.
- Eyes focused towards the sky.
- This posture stretches the chest and the abdomen and lifts the Prana (energy) upwards to the upper parts of the body.
Step – 12. Pranamasana
- Straighten the body and bring the hands in namaskar position in front of the chest as in the start position.
- Stand erect with feet together.
- Concentrate on standing straight, steady and in a meditative mood.
- This posture helps to induce a state of introversion, relaxation and calmness.


